

Show Rooms give you a visual and interactive experience where attendees can explore content inside your GoBrunch space. You can use them to present information, organize resources, showcase your work, or create different areas within your virtual space.
You can create a Show Room when creating a new space or add one to an existing space with a Live Room. You can also create multiple Show Rooms and organize them together with your Live Rooms.
In this guide, we’ll show you how to create and organize your Show Rooms.
Creating a Show Room from Scratch
You can create a Show Room when creating a new space in GoBrunch.
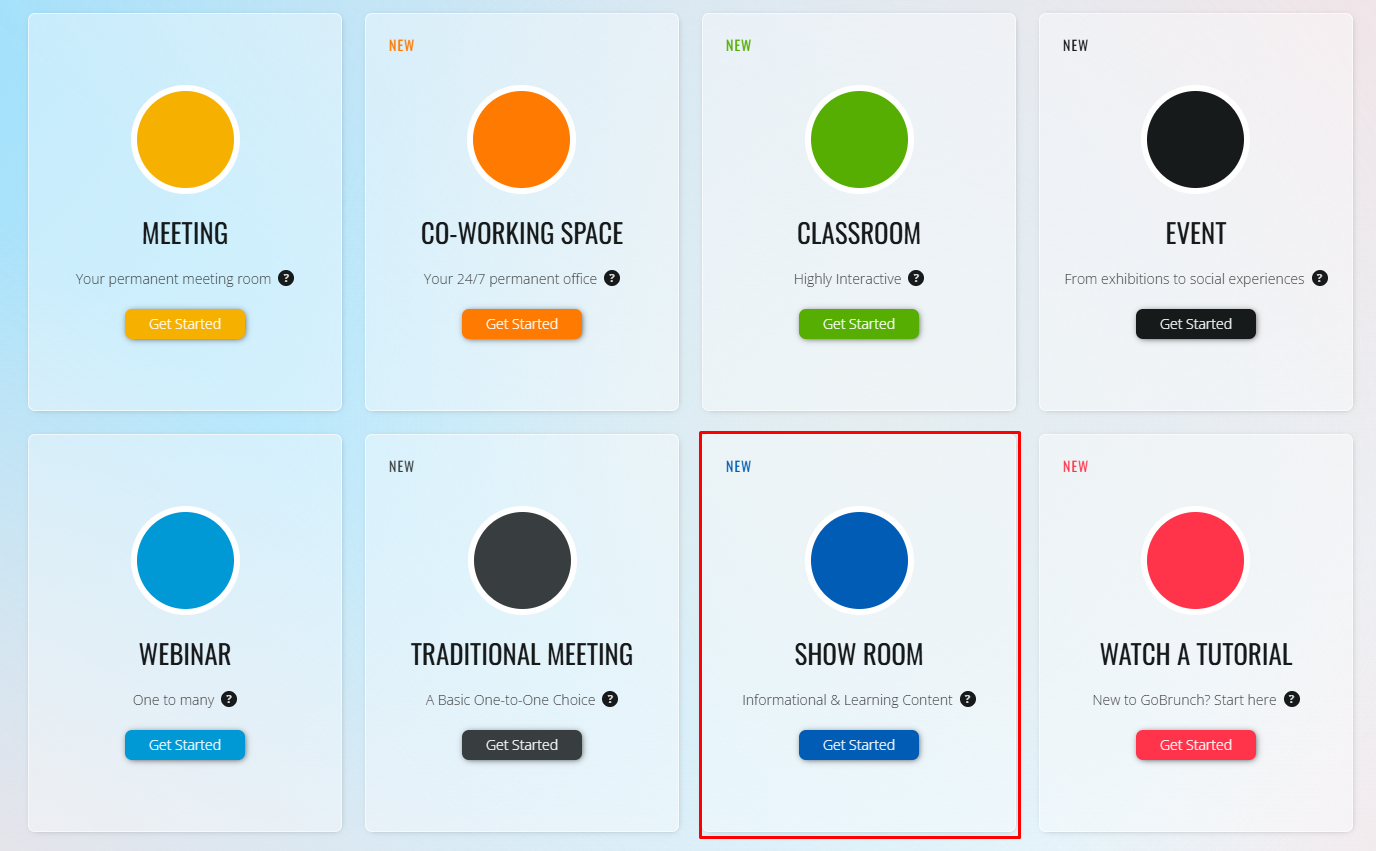
When you open the Create panel, you can choose how you want to start your space.
Option 1: Create a Show Room directly
Open the Create panel.
Select Show Room.
Enter the required information.
Create your space.
Your Show Room will be created and ready to customize.
Option 2: Create a Live Room first
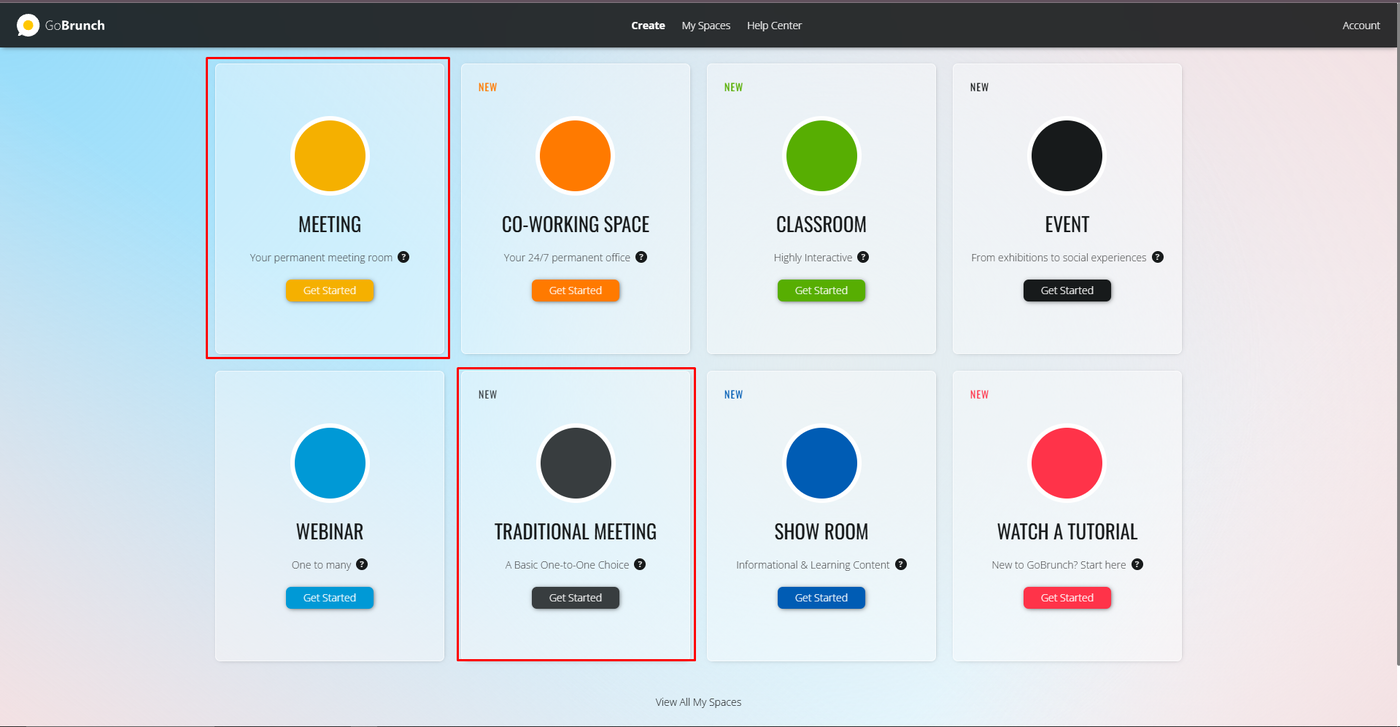
You can also start with a Live Room and add a Show Room afterward.
Open the Create panel.
Choose the option that best fits your use case.
Enter the required information.
Create your space with a Live Room.
Follow the steps below to add a Show Room to your existing space.
⚠️ Keep in mind: The Meeting and Traditional Meeting options do not support Show Rooms or additional rooms.
Creating a Show Room from an Existing Space with a Live Room
If you already have a space created, you can add a Show Room without creating a new space.
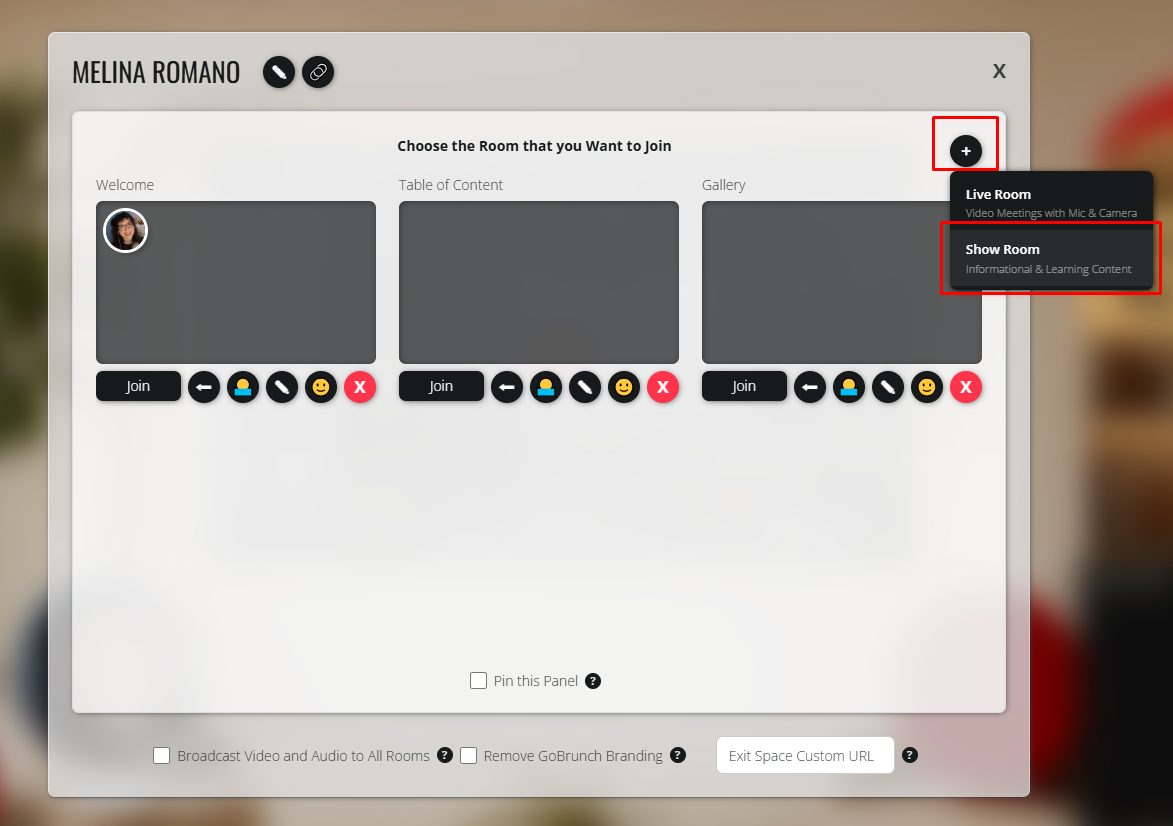
Enter your GoBrunch space.
Click All Rooms inside your Live Room.
Click the ➕ icon in the top-right corner.
Select Show Room.
Enter a name for your Show Room.
Click Add.
Your new Show Room will be added to your space.

Customizing Your Show Room
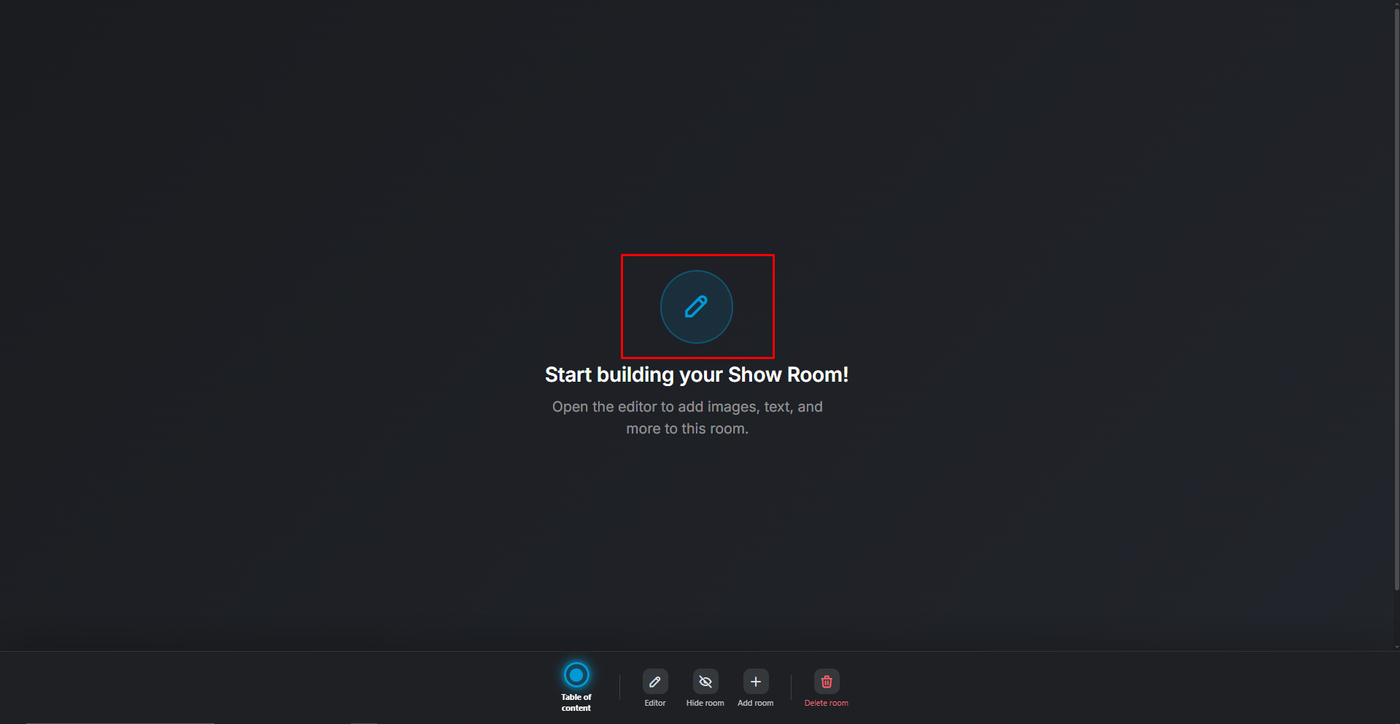
Once you create your Show Room, you can customize its appearance, content, and navigation using the GoBrunch Editor.
The Editor is available in both Show Rooms and Live Rooms, although some features are currently only available in Live Rooms.
For step-by-step guides on the different Editor features, check our Customizing and Branding Rooms articles.
To start customizing your Show Room, click the pencil icon.
Creating Another Show Room
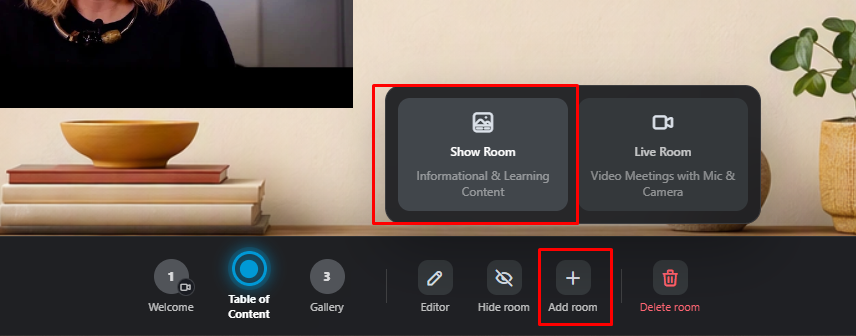
Once you have created your first Show Room, you can add more Show Rooms to organize different types of content within the same space.
Inside the Show Room interface:
Click Add Room.
Select Show Room.
Enter a name for the new Show Room.
Click Add.
You can create multiple Show Rooms within the same space.
For example, you could create Show Rooms for:
Portfolio
Gallery
Services
Information
Resources
And much more
Renaming a Show Room
You can easily change the name of any Show Room.
Double-click the room name.
Enter the new name.
Click outside the name field.
The new name will be saved automatically.
Reordering Your Rooms
You can organize your Show Rooms and Live Rooms in the order that best fits the experience you want to create.
To change the order:
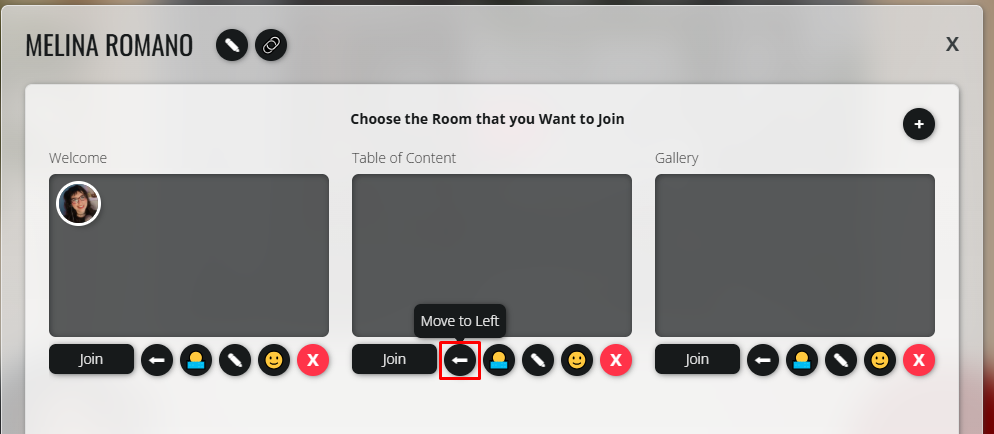
Open the All Rooms option inside a Live Room.
Find the room you want to move.
Click the arrow to change its position.
There is no single correct order for your rooms. You can place a Live Room first, follow it with one or more Show Rooms, start with a Show Room, or mix both types throughout the experience.
The best order depends on your use case and the experience you want your attendees to have.
Creating a Show Room + Live Room Experience
Show Rooms and Live Rooms can work together to create a complete experience.
Show Rooms can be used to present information, showcase content, organize resources, or guide attendees through different areas.
Live Rooms can be used for meetings, presentations, classes, events, conversations, and other live interactions.
Show Rooms vs. Live Rooms
Although both are part of the same GoBrunch space, Show Rooms and Live Rooms are designed for different purposes.
Show Rooms | Live Rooms |
|---|---|
Designed for exploring and presenting content. | Designed for live interaction and communication. |
Visual spaces that attendees can explore at their own pace. | Real-time spaces where attendees can participate. |
Great for information, portfolios, galleries, resources, and showcases. | Great for meetings, classes, presentations, events, and conversations. |
Can include images, text, links, embeds, and navigation. | Can be used for live presentations, discussions, and interactive activities. |
Help organize and communicate information visually. | Provide a space for attendees to interact in real time. |
You can combine both types of rooms in the same GoBrunch space and organize them according to the experience you want to create.
Important to Keep in Mind
You can create multiple Show Rooms inside the same GoBrunch space.
You can combine Show Rooms and Live Rooms in the same space.
You can customize your rooms using the GoBrunch Editor.
Some Editor features are currently only available in Live Rooms.
The Meeting and Traditional Meeting options do not support Show Rooms or additional rooms.
You can rename and reorder your rooms at any time.
There is no fixed order for Show Rooms and Live Rooms.
Recap
With Show Rooms, you can:
create a Show Room from scratch ➕
add a Show Room to an existing Live Room ➕
add multiple Show Rooms to the same space 🏠
customize your rooms with the GoBrunch Editor 🎨
rename your rooms ✏️
reorder Show Rooms and Live Rooms ↕️
combine Show Rooms and Live Rooms 🔄
create an attendee experience based on your content and use case 🧭
All directly from your GoBrunch space, with Show Rooms and Live Rooms working together. 🚀
Tips for an Enhanced Experience
A few simple tips can help you make the most of your Show Rooms:
Give each room a clear purpose. Think about what you want attendees to see, explore, or do in each room.
Use clear and descriptive names. This makes it easier for attendees to understand what each room contains.
Plan your room order. Arrange your Show Rooms and Live Rooms in a way that creates a natural flow for your attendees.
Combine Show Rooms and Live Rooms strategically. Use Show Rooms for exploration and content, and Live Rooms when you want attendees to interact in real time.
Customize your rooms to match your content. Use the GoBrunch Editor to create a visual experience that fits your purpose and audience.
Now you’re ready to create your Show Rooms in GoBrunch. We hope these tips help you create an engaging experience for your attendees!
For additional questions or help, feel free to reach out to our support team. Enjoy creating! 🚀
🎥 Watch the Tutorial
Want to see the full process in action? Watch our step-by-step tutorial to learn how to create, edit, and organize Show Rooms, including how to customize your space and add additional rooms.
💡 Get Inspired
Looking for ideas on how to use Show Rooms? Check out our use case video to see different ways you can organize your content and create engaging experiences for your attendees.