Understanding the Categories and the Presets
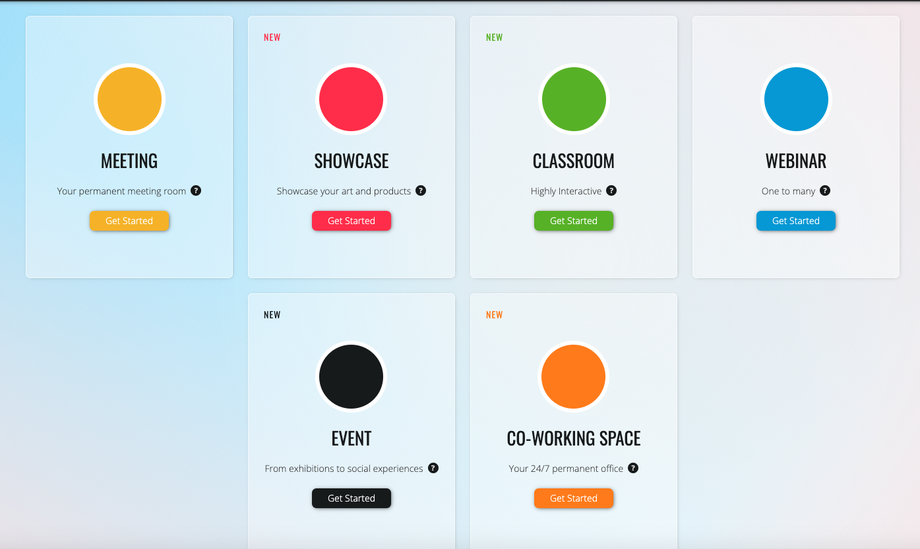
The Main difference between Meetings, Classes, Webinars, Events, Co-working Spaces and Showcases is the initial setup of the controls and some additional features not available in some of them.
Categories Comparison
The following table shows the differences between them.
| Meetings | Showcases | Classes | Webinars | Events | Co-Working | Traditional Meetings | |
| Multiple Rooms per Space | X | ✔ | ✔ | ✔ | ✔ | ✔ | X |
| Participants Can Turn On Their Mics | ✔ | R | ✔ | R | R | ✔ | ✔ |
| Participants can Turn On Their Circle-Cams | ✔ | R | ✔ | R | R | ✔ | ✔ |
| R | R | R | R | R | R | ✔ | |
| Participants can Share Their Screens | ✔ | R | R | R | R | ✔ | ✔ |
| Participants will Auto-Sit After Joining | R | ✔ | R | ✔ | ✔ | R | ✔ |
| Participants' Mics will be Turned On Automatically After Joining | ✔ | R | R | R | R | R | ✔ |
| Test Mic and Cam While Joining | ✔ | R | ✔ | R | R | ✔ | ✔ |
| Standard Preset of Breakout Rooms | NA | Same as Showcase | Same as Meeting | NA | Same as Meeting | Same as Co-Working | NA |
| Registrations and Attendance Reports | X | ✔ | ✔ | ✔ | ✔ | ✔ | X |
| Secret Key | NA | ✔ | ✔ | ✔ | ✔ | ✔ | NA |
| Save Chat History | R | ✔ | ✔ | ✔ | ✔ | ✔ | R |
| Default Display Layout | Dynamic | Dynamic | Dynamic | Presentation | Dynamic | Dynamic | Presentation |
*R = You can enable later from Inside your room, Under This Room > Room Settings.
Note that you can change, enable and disable the majority of the presets inside your room, even after creating your space. For example, as much as screen share is not initially available for Classes, you can enable it from inside your room at anytime. Scroll down to see more details on how to do that.
Glossary:
Multiple Rooms per Space: it means the space can have multiple rooms inside of it like breakout sessions. After joining, you can see all of them by clicking on All Rooms.
Participants can Turn On Their Mics: The icon of the Mic will be displayed for all participants to be be able to turn it on.
Participants can Turn On Their Circle-Cams: The icon of the Cam will be displayed for all participants to be be able to turn it on.
Participants can Share Their Screens: The icon of the Screen Share will be displayed for all participants to be be able to turn it on.
Participants will Auto-Sit After Joining: They don't need to click on a circle to seat, since this will be done automatically.
Participants' Mics will be Turned On Automatically After Joining: The Participants will receive a request for turning on their mics automatically once they join.
Test Mic and Cam While Joining: GoBrunch will automatically test the participants' mics and cams before taking a seat.
No Date & Time Notification: The Participants won't see a notification showing when the event starts.
Standard Preset of Breakout Sessions: While creating your Space, you'll be asked if you want to add more Rooms or Breakout Sessions on it. "Same as Meeting" means that the additional breakout sessions will be created using the preset of a Meeting. Note that you can add or change this setup later, from inside your rooms. For more information, check this article.
Registrations and Attendance Reports: You can download the registration and attendance CSV reports.
Secret Key: You can define a secret key to protect your meeting, and only people who type it correctly will be able to join.
Save Chat History: After your session, the chat will still be there. Every attendee who joins will be able to read the chat log.
Default Display Layout: GoBrunch has a Dynamic and Presentation View. Dynamic allows you to move and resize the cams, screens and chat. Presentation has a fixed position. Regardless the one that you previously chose, you can change from inside your Room under This Room.
How to Change, Enable and Disable the Presets and Features Inside the Room After Creating the Space
Note that you can change, enable and disable the majority of the presets inside your room, even after creating your space.
- Join your room. You can see all your rooms here.
- Take a seat.
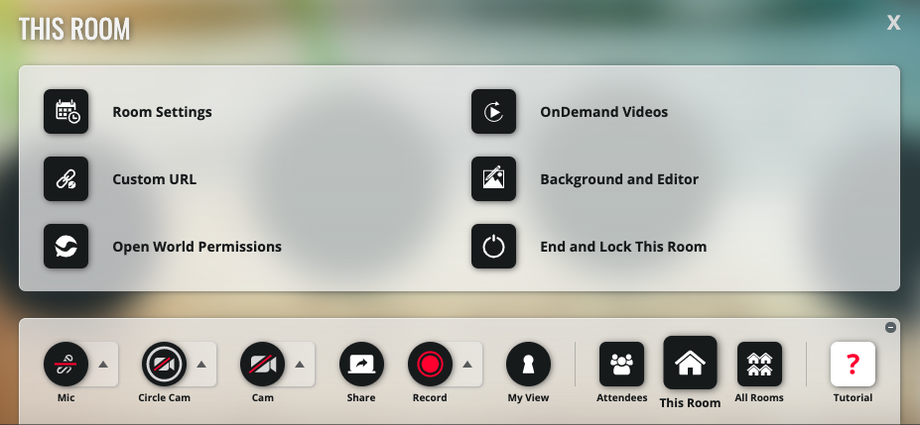
- Click on This Room located at your bottom menu.
- Click on Room Settings.
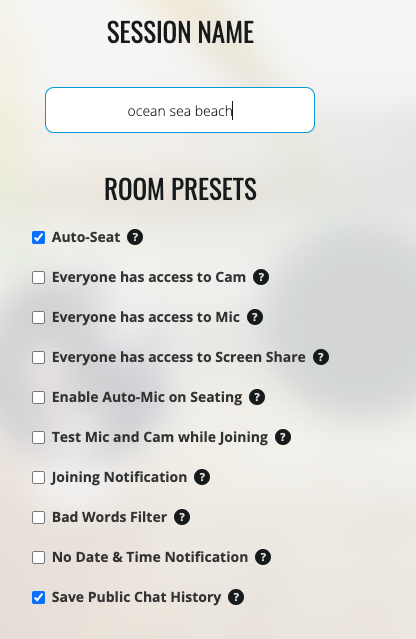
- Look at the left side of it under Room Presets.
- Check the the Presets that you want to activate.
- Scroll down and click on the Update button.
Note that Screen Share, Bad Words Filter and Save Public Chat History, Flip Cameras and Disable Gifs will only take effect for new people who join your room, after you have updated it.


